|
Project SV/MV/RC30/Ducati/GSX-R
By Chris Baker
I can't leave
anything alone. Never have been able to. I just like bikes that are
unique. I'
ve been riding a really trick Honda NSR 250 and RVF 400 for the
past few years. But this is the story of how my "make it special" approach
has impacted a 2001 SV650S.
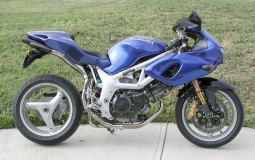 The SV is great! Love the V-twin. Always have. In fact, I had recently sold
an RC 51 and was wondering what I'd get next. The RC 51 is a nice bike but
unnecessarily fast for the street, at least the way I like to ride.
Imagine riding an RC 51 and then hopping on an NSR 250. I found myself
riding the RC 51 less and less. But I loved the power delivery of the
V-twin. A friend of mine was racing AFM 650 twins and I started to pay
attention to his SV and thought, "This is a great bike!" Then one day I
just went down to the dealer and bought a 2001 SVS. I really like the SVS
bodywork: not a full sport bike look, but some nice lines. It was
perfect�for about 600 miles.
As most of
you know, the stock SV could use a little help in the suspension and brake
department. And I happen to have a group of buddies who own a shop here in
northern California called Motomorphic. As the name implies, they
can do just about anything to metal, preferably metal associated with
motorcycles.
 So this
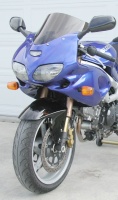
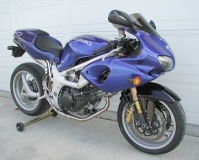
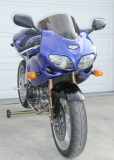
project began, innocently enough, with a front-end swap. If you couldn't
tell, I'm a sucker for a pretty face. I could have upgraded the stock
front end but was seduced by the inverted look. Had to have one on my SV.
Motomorphic helped me source a complete 2001 GSX-R 1000 front end. I like
the look of the gold tubes and the TiN on the sliders. Those 6 piston
calipers look great, too.
The conversion is very straightforward:
- remove the SV front end
- press the SV stem out of the lower triple
- weld it up then machine it to the appropriate size and
- press it to the GSX-R 1000 lower triple
- modify the GSX-R 1000 fork stops and
- bolt the whole thing back on
During the
conversion, I thought I'd need to get a set of TL-S bars to get the same
rise and clearance as the SVS bars. It turns out that the stock GSX-R 1000
bars work fine. They are about 1" lower but all the controls and cables
clear everything just fine.
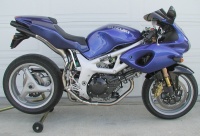
 OK, that's
the front. I then installed a Penske 3-way adjustable on the back. Done
and done! And let me tell you what a difference it makes. The SV is
transformed into the canyon carver it was always meant to be. Suzuki
should have made it this way in the first place. Plus, visually, the whole
front end looks more balanced. I always thought the SVS needed something
"meatier" than those skinny stock forks poking out from under that front
fairing. And the gold TiNitride looks great against the blue of the
bodywork. It stops a bit better than it used to, to say the
least.
So, with the suspension sorted, I started thinking about the
next set of modifications. I was surfing the web one day and I saw what
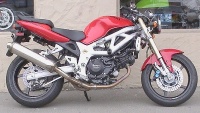
was clearly a Photoshop-modified picture of a red SVS with an Agusta MV
F4s tail pasted onto it. To me, it looked great. I thought, "Now we're
talking!" and my search was on.
I have a
buddy who calls me one day and says he found an Agusta F4 Strada tail,
complete with seat, tail light, all the brackets, etc. I told him I'
d take
it. Next, I posted on an Agusta forum that I was looking for an F4
subframe. Turns out a number of F4 owners are being harassed by their
girlfriends and are converting to the bi-posto set up. This requires
different tail plastic, seat, etc. Anyway, I got a response from a guy in
Florida who had done the conversion and ended up with a spare subframe. We
agreed a price for the subframe (they retail for about $1000!) and during
the conversation it came out the he also had the mono tail, seat,
taillights, etc. Can you say SOLD!? I also posted for a set of stock MV
mufflers. Well, this same guy contacts me and we agree a price for those.
In the end, I found two complete tails (seat, tail light, etc) and two
sets of stock mufflers. (Any ideas for what to do with the "spare" MV tail
section/seat and exhaust?) For the record, the retail price for the MV
parts alone is near $4,000. I was fortunate to have paid significantly
less than that.
 So, I had all
the parts I needed for the tail and exhaust conversion but in order to fit
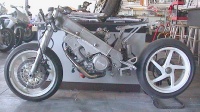
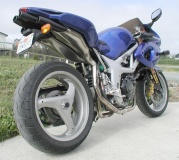
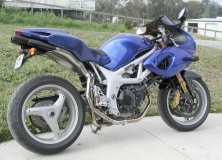
the exhaust, I first needed a single sided swing arm. Motomorphic to the
rescue!
You may have
figured out that Motomorphic was the key to this project. I fancy myself
the �idea/design'
guy but Motomorphic did all the machining and
fabrication work and sourced a bunch of the interesting stuff. Like the
complete Honda RC 30 swing arm/eccentric/rear brake set up, etc.
They had
previously installed a VFR 750 swing arm on their shop SV (see their
website for pics) but to my eye, the RC 30 arm, which is about 1" thicker
in terms of it's visual height, looks more appropriate on the SV. Plus, I
much prefer the way it carries the rear brake caliper underneath, rather
than on top of the swingarm. I think it makes for a much cleaner look. But
let me tell you, it was a big job to fit.
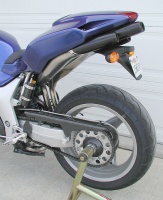
First, the RC
30 linkage is �backwards'
from the SV. That is, the swingarm itself lacked
the boss that the SV dog bones fit up to. The whole underside of the arm
had to be hogged out and then a block/plate was fabricated and fit to make
it work. Then the hole that the shock fits through had to be moved over
and back and then re-plated. It took better than 22 hours of machining and
fabrication work just to get the swing arm on.
Now, those of
you who want a single sided swingarm on your SV, have no fear. The mid
'90s VFR 750 arm comes with the boss set up essentially the way you need
it. All that'
s required is to widen the boss and fit the appropriate
bearings. OK, it requires a bit more than that but it's a great deal
easier and faster to fit than the RC 30. The Motomorphic SV has the VFR
arm on it and it was a far simpler mod. Ah, the joys of "going first!"
Anyway, the RC 30 arm looks great, it fits great and it works great. It
confuses people when they first see it. Most people ask if it's a Ducati
swing arm. I guess because they recognize the rear wheel as Ducati. Plus,
based on my conversations with people, it appears that not many people
know what an RC 30 is - can't blame them, how many people have even ever
seen one?
To finish off
the swing arm, I had a custom, one-off carbon chain guard made by a local
composite fabricator.
 Then it was
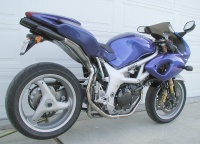
time for the rear wheel. I wanted to keep the look consistent with the
GSX-R 1000 3-spoke front wheel. Motomorphic sourced a Ducati 916 wheel,
which interestingly, has the same 4-shear pin spacing, etc. as the RC 30.
Go figure. Anyway, the chain line was figured as we fit the swing arm so
all we had to do was to fabricate a spacer to get the rear wheel alignment
right. That pushed the wheel to the right far enough that we had to
machine the RC 30 wheel nut spacer to work with what was now a �shorter'
axle. We also machined the thrust side of the spacer to fit the Ducati
wheel. The whole idea with all this is that I can now run a standard
Ducati rear wheel. Can you say 5-spoke Dymag Carbon�? Soon, my friends,
soon�
Next, we fit
the tail section. I have to say, it'
s really interesting how well the tail
fit up to the SV tank. A number of the style lines just plain "work". The
seat height went up a bit but I like that. It puts me over the front wheel
a bit more. A few folks who'
ve sat on it say it feels a bit like a Ducati.
In any case, the F4 subframe was cut to clear all the SV parts it had to
clear. Once the tail was positioned, it was a matter of bending some
aluminum tubing to fit and fabricating a set up that holds the tank hinge.
As you can see from the pictures, the seat flips up, just like on the F4.
It'
s all very tidy. All I had to do in terms of wiring was to slice the
loom and pull out the tail light, turn signal and license plate light
wiring as it needs to be able to hinge up with the tail
section.
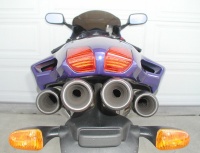
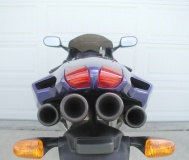
 Next Motomorphic fabricated and fit the exhaust. I ran the stock SV header but
you can see all the work that went into this. The rear head pipe had to be
re-routed to get around the swingarm and then it was a "simple" matter of
mating up the F4 mufflers to the rest of the header. It ended up being a
2-into-2 that uses the stock crossover. Well, OK, you could call it a
2-1-2-4 but that'
s really more of a visual description.
EVERYONE who
approaches the bike wants to hear it. It'
s a little bit of a
disappointment as these are stock mufflers off a 750. They are a tick
louder than stock but breath better. It really is nice that it'
s so quiet.
I wanted a bike that wouldn't upset my neighbors as I left for my weekend
early morning rides. Actually, it could be a bit louder and still be OK
but it does have a nice rumble and it just plain looks so cool. I could
not be happier.
A few things on the list of "little things" are:
- Fitting Race Tech Gold Valves and Race Tech springs and getting a softer rear spring to compensate for the fact that the RC 30 swing arm is a bit shorter than the SV. The recommended spring rate is now a bit harsh.
- Molding the tank to exactly match the F4 tail section
- Having a few decals made. Actually, this should be pretty cool. Let me explain: Agusta has six letters. So does Suzuki. My plan is to make a set of decals that look just like the Agusta MV decals but say �Suzuki SV�. It should be subtle enough that you have to look twice to notice
- Paint the front fender in the body color
- Relocate the shock reservoir inside the tail
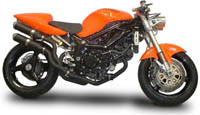
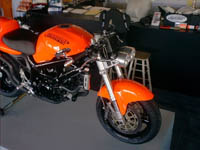
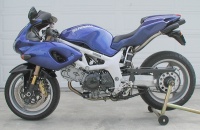 So there you have it. One pretty unique SV that, to my eye, looks like it could have come from the factory. It attracts attention everywhere it goes. I've met a bunch of people because most people have a bunch of questions about the bike. It'
s a great conversation starter.
I do have a
bit more work to do and that'
s most likely to be the case forever�But to
me, that'
s the point of a project bike, isn'
t it?
In closing,
Project SV/MV is turning out just as I'
d hoped. And yes, it is available
for purchase. The guys at MotoMorphic
know how to reach me, so if you're interested, give them a call.
Ride Safely.


|


